
Why Should I Multistream?
1. Increased reach
The most obvious benefit of multistreaming (aka simulstreaming) is that it allows you to reach a wider audience. When you stream to multiple platforms at once, you are exposing your content to a larger pool of potential viewers. This can be especially beneficial for new streamers who are trying to build their following.
2. Improved engagement
Multistreaming can also help to improve your engagement with viewers. When you stream to multiple platforms, you are more likely to have viewers who are active and engaged. This is because viewers are more likely to interact with a stream that is happening on their preferred platform.
3. Increased revenue potential
Simulstreaming can also help to increase your revenue potential. Many streaming platforms offer monetization options, such as subscriptions, donations, and advertising. When you stream to multiple platforms, you are eligible to monetize your stream on each platform. This can lead to a significant increase in your overall revenue.
4. Risk mitigation
Another benefit of multistreaming is that it can help to mitigate risk. If one streaming platform goes down, you can still continue streaming on the other platforms because it’s a simulstream! This can help to ensure that your viewers are never left without a stream to watch.
5. Brand building
Simulstreaming can also help you to build your brand. When you stream to multiple platforms, you are exposing your brand to a wider audience. This can help to increase brand awareness and attract new fans and followers. It is a great way to build your brand and connect with a wider audience.
Overall, we see multistreaming as an essential practice that can help streamers of all levels to improve their reach, engagement, revenue potential, and risk mitigation.
Method 1;
Free OBS Plugin
This is the easiest and the most straightforward method, but it is quite costly for your upload bandwidth.
Remember, a single 1080p 60fps stream requires 6 Mbps of upload bandwidth (aka allocation/speed), and multistreaming with the plugin increases the cost for each destination, for example, a multistream to four destinations would require up to 24 Mbps of upload bandwidth.
1- Find the plugin.
Go to the official plugin post and press “Go to download”.

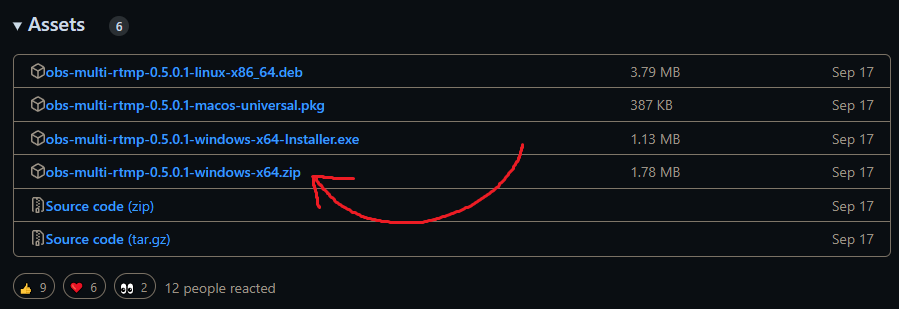
2- Download the plugin.
In the corresponding GitHub page, scroll down until you see the release packages available for download. Download the “windows-x64.zip” one.
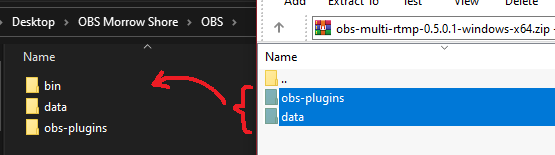
3- Add the plugin.
Drag the content of the zip file into your OBS folder and allow it to overwrite if prompted.
4- Run OBS.
You will now be met with a new tool in your OBS.
Remember, you still need to fill out a service in OBS’ Stream settings, but don’t include that in the Multiple Output Plugin’s targets.

5- Press “Add new target”.
You will see a new window with quite a few fields to fill out, but don’t panic, most of the fields are absolutely irrelevant.
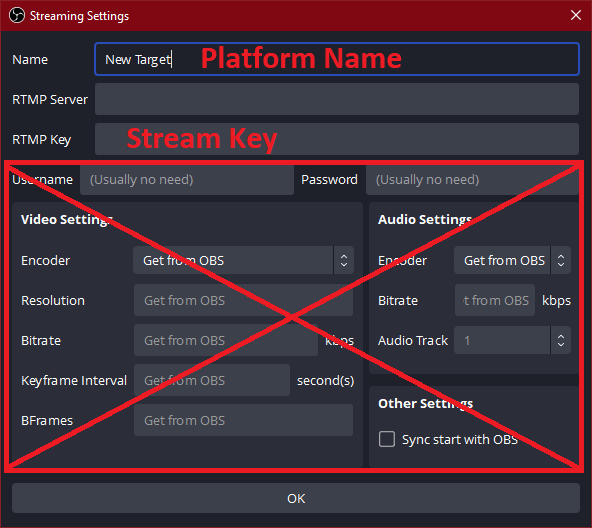
6- Specify the target platform.
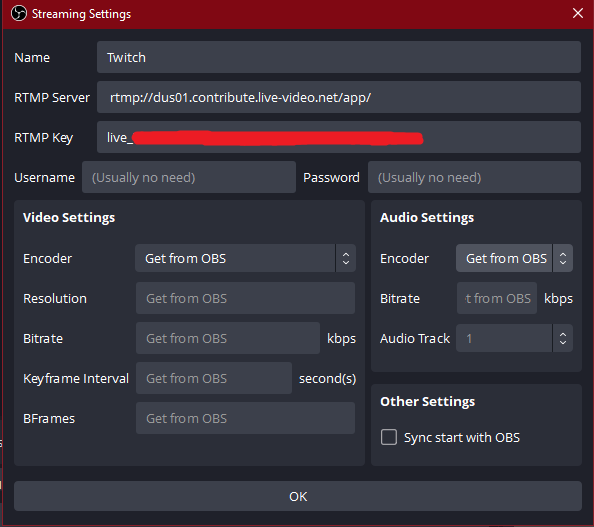
Fill out the name, RTMP Server, and RTMP Key with your target’s.
To get the RTMP Server, In case of Twitch, find the server that is closest to you and copy its address (without the “{stream_key}” at the end), then paste it into the RTMP Server field.
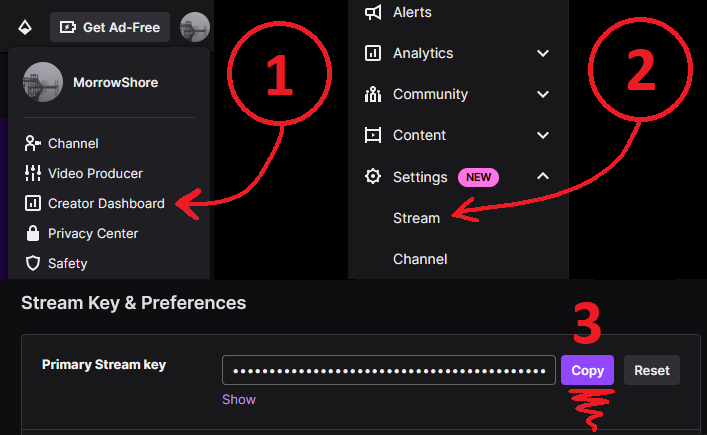
To get the RTMP Key, Then go to your Twitch creator dashboard, click on settings, open stream settings and copy your Primary Stream (RTMP) Key.
7- Confirm your information.
Here’s what it would look like for Twitch, using the Dusseldorf (1) RTMP server.
8- Do it again for other platforms.
Remember, do not add the platform you’ve added in OBS settings to the Multiple Output targets.
For example, If your primary target (in OBS stream settings) is YouTube, do NOT add YouTube to the Multiple Output targets
9- Done!
You can now just press “Start Streaming” and you will begin streaming to all the platforms you’ve added to your OBS and its Multiple Output plugin.
Method 2;
Self-Hosted Prism
This is the method we recommend, it uses Prism, which is completely open source and rather simple.
It doesn’t require amazing upload bandwidth, and is a lot less messy to use in the long term.
Since its only “cost” is that of a server, it is a LOT cheaper than services that charge for it.
In this guide, we’ll be setting up Prism on a VPS server, so then you can then simply stream to your Prism, and it will send your stream to all the platforms you’d like.
Since it’s done in a docker, you can also use the VPS for other purposes, for example, bots, websites, VPN, etc.
Perquisites
You’d need a VPS server for this, but fret not, its specification or power does not matter!
You can get very cheap (1~5 USD) Linux VPS from providers such as Linode, IONOS, Digital Ocean, etc.
We personally recommend the 2 dollar / month Ubuntu Linux VPS that IONOS offers.
Just buy the cheapest VPS server you can find, and then wait until you’re given your server’s IP address and root password.
How To Set Up Prism
1- Open CMD, Replace the <requirement> with your server’s IP address and SSH into your VPS server,
ssh ssh://root@<server IP address>2- Enter the password (it will be hidden). Type and send yes if it prompts you anything.
3- Update the system and Install docker by pasting the command line below (you must paste by right clicking).
sudo apt update && sudo apt upgrade -y && sudo apt install -y docker.io docker-compose4- Build our image:
docker build -t prism github.com/MorrowShore/Prism5- Verify it has been built:
docker images6- Now edit the following prompt with your own key, and then run it:
docker run -it -p 1935:1935 --name prism -e TWITCH_URL="<twitch server>" -e TWITCH_KEY="<twitch key>" -e FACEBOOK_KEY="<facebook key>" -e YOUTUBE_KEY="<youtube key>" -e TROVO_KEY="<trovo key>" -e KICK_KEY="<kick key>" -e RTMP1_URL="<custom RTMP1 server>" -e RTMP1_KEY="<custom RTMP1 key>" -e RTMP2_URL="<custom RTMP2 server>" -e RTMP2_KEY="<custom RTMP2 key>" -e RTMP3_URL="<custom RTMP3 server>" -e RTMP3_KEY="<custom RTMP3 key>" prismRTMP1, RTMP2, and RTMP3 refer to custom destinations; you can fill in the details of custom destinations or platforms by filling in the RTMP variables with their server URL and the stream key. If you’re not going to stream to a specific platform, simply remove it from the prompt (along with the “-e” before it).
7- In OBS’ stream options, enter the following in the Server field:
rtmp://<server IP address>/live/
As for the stream key, you can put anything.
8- Begin streaming!
We advise you test it with two platforms first.
How To Manage Prism
To STOP the docker, (multistreaming server) run:
docker stop prismTo START the docker, run:
docker start prismTo EDIT the destinations,
Remove the container:
docker rm prismand then run an edited prompt at step #6
To UNINSTALL the entire project, run:
docker rm prism
Then,
docker images
Copy the image ID and then run:
docker rmi <IMAGE_ID>
To ADD CloudFlare & Instagram support:
Add the following arguments to the prompt #6
-e CLOUDFLARE_KEY="<key>"
-e INSTAGRAM_KEY="<key>"
Parting Notes
Did you find this guide useful?
Support us on Patreon!
Even with a very small tip, you’ll greatly encourage us to create better guides and provide better support!
Check out our website and community too!
Join our troupe!
Our streamer troupe members are supported with overlays, panels & assets… featured and raided by one another… and of course, helped with technicalities & finding sponsorships!
Best of all, it is completely free!
To see if you’re eligible, email us about yourself, and include links to your stream at:
Join @ morrowshore.com
You can check out Prism here: https://github.com/MorrowShore/Prism
It is completely open source and free.


Leave a Reply